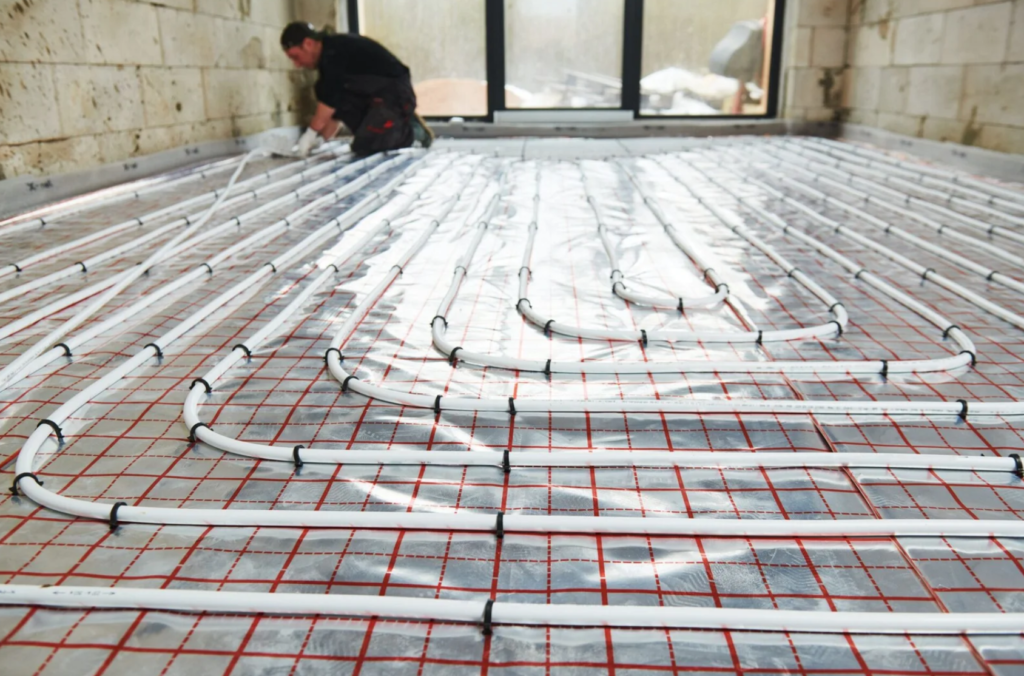

Underfloor heating has quietly stopped being a luxury. For years it was something you saw in architect-designed new builds and hotel bathrooms, and most homeowners assumed it was out of reach unless they were starting from bare concrete. That assumption is now out of date. Low-profile systems, better controls and the general shift towards lower flow temperatures have made retrofitting far more realistic than it was even a decade ago.
It is still not a decision to make casually. Underfloor heating is buried under your floor, which means getting it wrong is expensive to put right and the mistakes are usually made on paper long before anyone turns up with tools. Here is what actually determines whether a retrofit works well.
Why it heats differently to a radiator
A radiator is a small, very hot surface. It heats the air immediately around it, that air rises, cools, drops, and circulates. The result is a room that is warm near the radiator, cooler by the window, and stratified from floor to ceiling. Anyone who has sat on a sofa positioned across the room from the only radiator knows the feeling.
Underfloor heating turns the largest surface in the room into the emitter. Because the area is enormous compared with a radiator panel, it does not need to be anywhere near as hot to deliver the same heat output. A wet system typically circulates water at somewhere between 35 and 45 degrees, against the 60 to 75 degrees a traditional radiator circuit is designed around.
That lower operating temperature is the whole point, and it produces two effects. Comfort improves noticeably, because the warmth is even and there are no cold corners. And the heat source runs more efficiently, since a condensing boiler only genuinely condenses when its return water is cool enough. It is also the reason underfloor heating pairs so well with heat pumps, which lose efficiency sharply as flow temperature rises.
Wet or electric: the decision that shapes everything else
Almost every other choice follows from this one.
Wet systems
These run pipework beneath the floor, fed from your boiler or heat pump through a manifold. Running costs are considerably lower than electric because you are using gas or a heat pump rather than electricity, which is priced several times higher per unit. Wet systems suit whole floors, open-plan spaces and extensions, and they are the right answer for anything you intend to use as primary heating.
The trade-off is installation. Pipework, a manifold, a pump, blending valves and connection into the existing system all take time and disruption. In a retrofit this usually means lifting the floor.
Electric systems
Thin mats or cables sit directly under the floor covering. Build-up is minimal, a single room can often be finished in a day, and there is no pipework to route. For a bathroom refurbishment or a small room that has never had adequate heating, this is frequently the pragmatic choice.
The catch is running cost. Electricity is expensive enough per kilowatt hour that electric underfloor heating is generally sensible for intermittent comfort heating in small areas, and rarely sensible as the main heat source for a large space. People who install it across a whole ground floor often regret it in January.
The constraint nobody mentions until it is too late: floor height
This is where most retrofit projects run into trouble. Every underfloor system adds height, and in an existing house that height has to come from somewhere.
A traditional screeded wet system can add 65 to 100mm once you account for insulation and screed. In a new build that is designed in from the start. In an existing home it means your floor now sits higher than the hallway, your doors no longer close, your skirting is buried and the bottom step of your staircase is a different height to all the others.
Low-profile retrofit systems exist precisely for this reason and can bring the build-up down to around 15 to 25mm, using thinner pipe in pre-routed insulation panels. Between joists, systems can be installed from below or from above with almost no height gain at all. These options cost more per square metre than a standard screed system, but in an occupied house they are often the only realistic route.
Measure before you get attached to the idea. Check the threshold heights, the door undercuts, and whether your stairs give you any headroom to play with.
Your floor covering matters more than you think
The system has to push heat up through whatever sits on top of it, so the covering is part of the heating design rather than a decorating decision made afterwards.
- Tile and natural stone are ideal. Dense, conductive, and they hold warmth well.
- Engineered wood is generally fine and far more stable than solid timber, which can shrink, cup or gap with repeated heat cycling.
- LVT and vinyl work well, though check the manufacturer maximum surface temperature.
- Carpet is where problems appear. Carpet and underlay combined should usually stay below around 2.5 tog. Go thicker and you are insulating the room from its own heating system.
Decide the floor covering before the system is designed, not after. Output calculations depend on it.
Old houses need the insulation underneath sorted first
Heat radiates in every direction, including downwards. Without proper insulation beneath the pipes or mats you are warming the ground, the void, or the ceiling of the room below, and paying for the privilege. In a period property with suspended timber floors this step is not optional. An installer who deals with underfloor heating St Albans homes on a regular basis will already know that the Victorian and Edwardian stock near the city centre behaves very differently to the newer housing on the outskirts, and will specify insulation accordingly rather than applying one standard detail to every job.
The same logic applies to the fabric of the room generally. Underfloor heating is a low-temperature system, which means it has less headroom to fight heat loss than a radiator running at 70 degrees. In a poorly insulated room with single glazing and an uninsulated floor void, it may simply fail to keep up on the coldest days. Address the losses first and the system will be smaller, cheaper to run, and more comfortable.
Controls, zoning and the slow response problem
Underfloor heating has thermal mass. A screed floor takes a long time to warm up and an equally long time to cool down, which makes it excellent at holding a steady temperature and poor at responding to sudden demands. Setting it to come on half an hour before you get home, the way you might with radiators, does not work.
The right approach is usually a longer, gentler run at a lower temperature, with weather compensation if your heat source supports it. Individual room thermostats linked to manifold actuators let you zone the house sensibly, so the kitchen and the spare bedroom are not heated on the same schedule.
One thing worth flagging: mixing underfloor heating and radiators on the same circuit needs proper design. The two want completely different flow temperatures, and the usual solution is a blending valve or a separate low-temperature circuit off the manifold. Plumbed together without that, one of the two will always be wrong.
Mistakes that turn up repeatedly
- Sizing the system by floor area alone, without a room-by-room heat loss calculation.
- Choosing a thick carpet after the design is finished and wondering why the room never gets warm.
- Skipping the insulation layer to save money or height.
- Running pipe under fitted kitchen units and immovable furniture, wasting output where nobody stands.
- No photographic record of the pipe layout before the screed goes down, which makes any future drilling into the floor a gamble.
- Failing to pressure test the pipework and leave it under pressure while the screed is poured.
That last one deserves emphasis. A leak discovered after the floor is finished is the single most expensive failure in this entire process, and it is entirely preventable with a test that takes an afternoon.
Getting it specified properly
The quality of the design matters more here than the brand of pipe. A proper survey should produce a room-by-room heat loss figure, a pipe spacing and layout drawing, a stated flow temperature, a floor build-up detail, and a controls strategy. If a quote arrives without those, it is a price rather than a design. Firms such as Plumb Heating Ltd, which handles both wet and electric installations across Hertfordshire, will survey the property and set out the options before quoting, and that survey is where the money is genuinely saved.
Ask to see the heat loss calculation. Ask what flow temperature the system is designed around and how that integrates with your existing heat source. Ask what happens to the floor height at every threshold. An installer who can answer those three questions clearly is one worth using.
Is it worth doing?
For an extension, a full ground floor renovation, a bathroom refit, or any project where the floor is coming up regardless, the answer is usually yes. The incremental cost is modest when the disruption is already happening, and the comfort improvement is the sort of thing people notice every day for years.
For a single room in an otherwise untouched house, with no other work planned, the calculation is tighter and depends heavily on how easily the pipework can reach the manifold.
What is no longer true is that underfloor heating belongs only in new builds. The systems have adapted to existing housing stock. The projects that go well are simply the ones where somebody worked out the floor height, the insulation and the flow temperature before anyone started lifting boards.